6504-blogspot

  • Subscribe to our RSS feed.
  • Twitter
  • StumbleUpon
  • Reddit
  • Facebook
  • Digg

Montag, 30. Januar 2012

Spring Cleaning

Posted on 06:22 by chsndrapaul
You might be saying, "Seriously? It's still winter."
My response, "I can't help it!"
I get the Christmas decor down and I'm itching to clean.

I thought I'd start my actual 'Spring Cleaning List' early with a few little things from my Crazy Spring Cleaning Week.

If you'd like to work along with me, I'll try to post every week of what I have been working on so that you can get a head start too! Don't worry, it'll be light easy things that can easily be added to your everyday things that you already clean/organize/put-away/cook, etc.

Jewelry Cleaning
I cleaned out my jewelry cabinet and it has been
much more fun picking out jewelry for the day!

Before:

During:

After (jewerly to add to the get rid of pile):

Coffee Stash
I received a few free coffee samples in the mail one day last week. When I put them away, I realized the cabinet that had all our coffee/hot chocolate/tea needed to be re-organized.

Before:

(Hot drinks are much better with fun mugs! Get ones like these here!)

During:
(Take it all out, wipe it down, put most of it back.)

After:


Coffee Stash turned Spice Stash
When I cleaned out the 'Coffee Stash' I found some cinnamon that needed to be in the Spice Stash Cabinet. Well, that needed re-organizing too!

Before:

After:
(Sometimes you forget you can move your cabinet shelves to help re-organize!)

Spice Stash turned Potholder Drawer
When I was moving the shelves in the Spice Stash Cabinet, I had to use my jar-opener-gripper-thing-so-you-don't-get-blisters to remove the shelve pegs. So when I put the gripper-thing back into the drawer, yep, that needed cleaned out too. (This is the point at which I didn't let myself open anymore cabinets so that I could get out of the kitchen!)
Before:

After:
(The green thing on the bottom right is the grippy-thing I was talking about)

And to think it all started with free samples!
Read More
Posted in Cleaning | No comments

Donnerstag, 26. Januar 2012

Freezer Stocking- Cranberry Chicken

Posted on 06:06 by chsndrapaul
I purchased 3 packages of Bone-In Chicken Thighs for $1 a pound. I decided to make my Cranberry Chicken for dinner and also freeze two bags of Cranberry Chicken to have on hand for two other meals down the road.

Here's How:
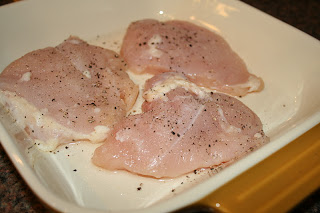
1. I started with 12 bone-in chicken thighs. After skinning them, I divided them up. (4 thighs into a baking dish- for dinner, and 4 thighs each in the 2 re-sealable freezer bags- for future dinners.)


2. I made the cranberry mixture (this is a double version of the original)

2 packages onion soup mix
1 large bottle of Catalina dressing
2 cans whole berry cranberry sauce

3. After mixing the cranberry sauce, I divided it up between the 3 chicken dinners. (It ended up being 1 1/2 cups for each dinner.)


The Cost Breakdown:
Chicken- about $7
Cranberry Sauce- less than $2 for 2 cans (I found them in the dented clearance section. Not to self: Stock up on cranberry sauce during the Holiday Seasons!)
Onion Soup- $0 (they were in my pantry)
Catalina Dressing- $1.50 (I found the store brand equivalent to Catalina Dressing so I saved some money there)

So, less than $11 for 3 main courses. ($3.67 each)
Not to mention the time I saved by preparing meals ahead of time!
Read More
Posted in Chicken, Dinner | No comments

Dienstag, 24. Januar 2012

Critique Me

Posted on 13:43 by chsndrapaul
I made Lindsey's Glazed Pecan Bars that I posted late last year. I followed my own recipe as if I was someone else making these bars for the first time.


They were still as good as they look!

Things I changed:
1. I thinned the glaze some by adding more maple syrup. (This really is a preference thing.)
2. I changed the baking time. It could be that the first time I made them, I used a glass 9 x 13 pan. This last time, I used a dark 9 x 13 pan. After pre-baking the crust, I finished baking the bars at 450* for 15 minutes and then at 350* for 15 minutes. (I had originally done 450* for 15 minutes and then 350* for 30 minutes.) Basically, just keep an eye on them as they're baking. :)

Have you made them? Critique my recipe!
Read More
Posted in | No comments

Montag, 23. Januar 2012

Christmas Card Album

Posted on 13:32 by chsndrapaul

I have received  so many beautiful, thoughtful cards over the Holiday seasons! I certainly didn't want to throw them away or even stick them in a box (A box that I will find 5 years from now). I needed to put them in a spot where they belong.

"Everything has a place, and everything in it's place."

These blessings (sent in card form) needed a place to belong.
And I had two perfect guinea pigs friends to make these neat albums with!
(Thanks Pinterest for another splendid idea!)

Christmas Card Album

What You'll Need:
Scissors
Hole Puncher
Thin cardboard (I used the cardboard backing to 12x12 stacks of paper that you buy to stock up your scrapbook paper stash)
Scrapbooking paper (I used Christmas paper I found that was not your 'typical' Christmas colors)
Ribbon
Embellishments (This can be left open to what you want and what you like. For me, the embellishments picked were based on what I had on hand.)
Glue dots
Metal ring (One that can be opened and closed- not a key ring type.)

Here's How:
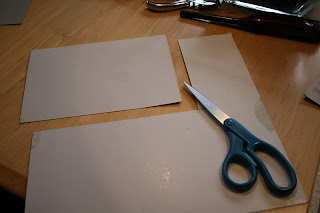
1. Start by measuring your largest card. (Width and length) You will be cutting 2 pieces total of cardboard to use as your 'front' and 'back' to your album.
Mine ended up being a little over 8 inches tall and almost 6 inches wide.

2. You will then use one of your cut cardboard pieces as a template to cut 4 pieces of scrapbook paper the same size. (Before you use your 'template' make sure your 2 cardboard pieces are the same size.)

3. Use glue dots to glue your paper pieces to your cardboard. The glue dots are perfect for this project because there is no mess and regular glue can wrinkle your paper when it dries.
You will be covering the front and backs of your cardboard- that is why you need 4 pieces cut.

4. I cut other scraps of paper to add interest and layering to the front of my album. I had a 'N' chip board that I glued on also.
To achieve the dark edges on your paper, try brushing an ink pad (I used brown here) across the edges to give a distressed look to your projects.

5. Cut a piece of ribbon long enough to wrap around your cards. (This is how you will keep your cards together at the end.)
I attached my ribbon with.... you guessed it :) Glue dots.

6. Next comes the hole punching.
Start by punching your cardboard front and back. Make sure to punch far enough away from the edges but not too far in that you will be punching out an eye in your photo cards.
Use your already punched cardboard piece as a guide to punch all of your cards in the same spot!

7. Start hooking! I put my back piece on first, then my cards, and then ended with my front piece.

8. Snap closed....

Tie and Wha-La!!!!
Open your Christmas Card Album anytime of the year to see and remember your friends and loved ones.
(Find another version here.)


I'm thinking "Pinterest Playdates" once a month??? Anyone????
:)
Read More
Posted in Memories, Pictures | No comments

Mittwoch, 18. Januar 2012

Valentine's Day Card Idea

Posted on 12:50 by chsndrapaul
Here's our super cute Valentine's Day cards that Reese handed out in her classes at school and Church last Valentine's Day...

And here's how I did it...
1. Take a picture like this (or similar). Hand extended, "Pretend you are holding a stick".
2. I ordered generic Valentine photo cards from here. (Although, you could just use a printed picture.)

3. When you get the cards, punch one hole above the hand and one below the hand.
I bought a bag of mini lollipops to put "in" her hand as the candy part of her Valentines.

Super cute and very personalized!

Here are my little Valentine's last year...


Read More
Posted in Valentines Day | No comments

Dienstag, 17. Januar 2012

2012- Goals For the Year

Posted on 10:26 by chsndrapaul
Notice I call them goals and not 'resolutions'.

"A Resolution- a resolve or determination." (dictionary.com)

The word 'determination' sounds so firm! I wanted to take some of the pressure off of my list of things to accomplish in 2012 so I'm calling them goals. That way, if they don't happen, it's okay! A year is a long time.
I don't know what the future holds and as circumstances in life change, my goals might also.

With that said, here they are....

Health Goals:
1. Floss more regularly. I am aiming for every other day. (I'm hoping my Dental Hygienist is reading this! Her scrapping every 6 months is the reason for this goal. hehe)
2. Drink more water. Boy, that was hard to type. I try to drink lots of water, but I kinda hate it! (Just being honest) I know it has great health benefits and I plan on seeing some this year! My goal is to drink 2 full glasses of water a day. That doesn't really sound like much as I type it, but I know it'll be hard to pass up sweet tea and choose to drink water instead!

Home Goals:
1. Pantry Project- Remove existing shelving and replace it with more space-efficient shelving. I will also reorganize it and I am going to try to 'stock it up' on food items.
(See what I mean? So much wasted space. My little Artist's corner -top right- is starting to take over.)

2. Guest Bedroom Project- Transform the existing play room (our spare bedroom upstairs) into a guest bedroom. Removing the toys, adding a bed and bed tables, paint, window treatments, decor.
3. Hall Closet Project- Remove existing clothes rack and install space-efficient shelving. This will be the new place for some toys and 'some' off-season clothes. Because, really, who needs an entire second closet for clothes (half of which we don't wear)?!?!?!

4. BASEMENT (ugh) This was on my 'goals' for 2011. Obviously, it didn't get done! I was planning on doing a clean-up over haul on all the stuff down there! It was all in hopes of starting to re-finish our basement, which was also on the 2011 goals list. But, we changed our minds on the basement finishing project, so the clean-up project didn't seem so important. It has gotten so bad that I now cannot go into the basement without coming back up in a really bad mood.
(I spared my family of a grumpy Mommy by staying upstairs to take the picture. It's also a huge tripping hazard down there!)

Family Goals:  (Without getting too specific and personal)
1. Making special time for my kids individually.
2. Taking trips to the Library more often.

Spiritual Goals:
1. Read through the Bible in one year.
2. Making my quiet time, a 'priority time'. Priority- over cleaning and other time consuming things that can be temptations to put your Bible to the side. Time- meaning, quality and quantity.
3. Praying more with (and for) my husband. Going beyond dinner prayers and good-night prayers with the kids.

Shew! It sounds like a lot, but a year is a long time as you go day by day. I know when the clock strikes midnight and we begin the New Year of 2013, I'll be saying "Where did 2012 go?" (Hopefully, I'll be saying that with a glass of water, cleaner teeth, a clean basement, organized closets, and a happy, well read to, family!)
Happy 2012 Goals!


*Confession. I added these HORRIBLE pictures to show you the 'before'. If I know that you have seen the before, I'll be more likely to show you the afters! :)
Closet re-do coming to a blog near you!!!!!
Read More
Posted in | No comments

Montag, 16. Januar 2012

Swiss Chicken

Posted on 07:05 by chsndrapaul
Easy and delicious, this Swiss Chicken is sure to satisfy!
(I'm not usually a fan of Swiss cheese so don't let that scare you off if you are like me!)


Swiss Chicken:

What You'll Need:
4 Skinless, boneless chicken breasts
s & p
8 slices of Swiss cheese
1 can of cream of chicken soup
1/4 cup chicken stock
1 cup stuffing
4 Tb melted butter

Here's How:
1.  Pre-heat oven to 350*. Place chicken in a 9x13 dish. Season with salt and pepper.
(The recipe calls for 4 pieces of chicken, but I only had three. It turned out just fine!)

2. Layer 2 slices of cheese on each piece of chicken.

3. In a bowl mix the soup and stock. Pour over chicken.

4. Sprinkle stuffing on top and pour melted butter over all.

5. Bake 30 minutes or until the chicken is cooked through.

I serve mine over colored pasta that is cooked and buttered.
Enjoy!
Read More
Posted in Chicken, Dinner | No comments
Neuere Posts Ältere Posts Startseite
Abonnieren Posts (Atom)

Popular Posts

  • DIY Faux Roman Shade
    I've read so many different ways to make your own faux roman shade. (Faux meaning, it doesn't actually work as a shade; this one is ...
  • 31 Days of Things I've Been Wanting to Do, Day 8: You Raise Me Up
    Have you ever stayed the night somewhere that you literally had to 'climb into bed'? The beds in my parents house are exactly that. ...
  • It Never Hurts to Ask...
    When I shopped at Gymboree last week, I had every intention of ONLY buying Reese new school shoes. (This is the second year in a row that sh...
  • Fall Pumpkin
    A super cute, super EASY way to give your home that extra special, personal touch....  Chalkboard Message Pumpkin.  Here's How: 1. Wash ...
  • Are You Ready For Some Football?
    If you're like me and hosting a Super Bowl Party this weekend, you have probably already been thinking football food! I think 'Footb...
  • Happy Fall Y'all!
    Did you think I fell off of the face of the planet? Well, I didn't and the great excuse for my absence....  life is happening too fast! ...
  • Beefy Macaroni
    Filling. Easy. Comfort. Delicious. {All ways to best describe this  Beefy Mac!  } What You'll Need:  8 ounces elbow macaroni, uncooked...
  • Easy Lemon Asparagus
    Do you need a new side dish to throw into your dinner rotation? Well, Lemon Asparagus is just about the easiest side dish I've ever made...
  • Crock Pot Baked Potato Soup
    I've made this delicious, belly-warming soup a lot.  And each time, I am so excited at how much it ACTUALLY tastes like  Baked Potatoes!...
  • Salsa
    Some of my favorite recipes come from a friend, of a friend, of a friend.... Here's a good one from a friend of a friend. Salsa Yeah, no...

Categories

  • Appetizers
  • Apple
  • Baby
  • Beverages
  • Birthday
  • Books
  • Bows
  • Bread
  • Breakfast
  • Bump Date
  • Burlap
  • Cake
  • Carmel
  • Chalk Paint
  • Chalkboard
  • Chicken
  • Chocolate
  • Chocolate Chip
  • Christmas
  • Cleaning
  • Cookies
  • Cupcakes
  • Curtains
  • Decorating
  • Decorations
  • Dessert
  • Dinner
  • Dips
  • Disney
  • DIY
  • Easter
  • Elf on the Shelf
  • Fall
  • Family
  • Fathers Day
  • Favorites
  • Felt
  • Gift
  • Gifts
  • Graduation
  • Grilled
  • Halloween
  • Holidays
  • Kid Craft
  • Make-Up
  • Memories
  • Muffins
  • Olympics
  • Organization
  • Paint
  • Painting
  • Party
  • Photography
  • Pictures
  • Pie
  • Potatoes
  • Pregnancy
  • Pumpkin
  • Pumpkin Patch
  • Recipes
  • Sewing
  • Side Dishes
  • Soup
  • Spring
  • Starbucks
  • Thanksgiving
  • Traditions
  • Valentines Day
  • Winter
  • Wreaths

Blog Archive

  • ►  2014 (16)
    • ►  Juli (1)
    • ►  Juni (1)
    • ►  Mai (2)
    • ►  April (2)
    • ►  März (5)
    • ►  Februar (2)
    • ►  Januar (3)
  • ►  2013 (33)
    • ►  Dezember (1)
    • ►  November (1)
    • ►  Oktober (2)
    • ►  September (1)
    • ►  August (1)
    • ►  Juli (1)
    • ►  Juni (1)
    • ►  Mai (1)
    • ►  April (2)
    • ►  März (7)
    • ►  Februar (8)
    • ►  Januar (7)
  • ▼  2012 (113)
    • ►  Dezember (10)
    • ►  November (1)
    • ►  Oktober (4)
    • ►  September (2)
    • ►  August (6)
    • ►  Juli (7)
    • ►  Juni (8)
    • ►  Mai (12)
    • ►  April (21)
    • ►  März (14)
    • ►  Februar (15)
    • ▼  Januar (13)
      • Spring Cleaning
      • Freezer Stocking- Cranberry Chicken
      • Critique Me
      • Christmas Card Album
      • Valentine's Day Card Idea
      • 2012- Goals For the Year
      • Swiss Chicken
      • Easy Ranch Potatoes
      • Mini Blackberry-Apple Crumbles
      • The Night Before the Most Magical Place on Earth!
      • Sugar Cookies
      • Pumpkin Pie
      • Chocolate Snowflake Cookies
  • ►  2011 (74)
    • ►  Dezember (20)
    • ►  November (16)
    • ►  Oktober (31)
    • ►  September (2)
    • ►  August (1)
    • ►  Juni (1)
    • ►  April (3)
Powered by Blogger.

Über mich

chsndrapaul
Mein Profil vollständig anzeigen