6504-blogspot

  • Subscribe to our RSS feed.
  • Twitter
  • StumbleUpon
  • Reddit
  • Facebook
  • Digg
Posts mit dem Label DIY werden angezeigt. Alle Posts anzeigen

Donnerstag, 19. Dezember 2013

Felt and Burlap Tree Skirt

Posted on 11:54 by chsndrapaul
With 6 days until Christmas, I am done with my burlap tree skirt.
I'm finding out with three kids under toe, accomplishments come in small steps.
{I say "Yay!" for finishing it, even though the presents that I'm about to wrap will just cover it up!!!}


Here's what I started with (along with scissors, my glue gun, and about 3 yards of white felt)...

I folded the felt in half and placed my current tree skirt over it to use as a pattern to cut my half circle.
It looked just like this....

Then came time to fire up the glue gun and unroll my burlap (I used two of the 15 foot rolls pictured above).

(Please note that I was not trying to have perfect ruffles. If I did try to get them perfect, I wouldn't have EVER finished this project. Burlap is imperfect so, let your ruffles be too!)

After hot gluing the start of the burlap roll to my cut felt tree skirt, it all went something like this....

Glue (can you see it there on the felt?):

 Place burlap on the glue:

Pinch a section:


Fold the pinched section back over the part you just glued:

Glue the top of the fold:

Run to your kitchen (after you have burned your finger 100 times) and get a wooden stick to press the burlap down until it sticks enough to stay where you want it:

 Continue the entire way around your tree skirt, flip it over and place it under your tree:


I added burlap bows around my tree.

To continue my burlap and white theme, I used small rolls of white mesh and layered burlap ribbon on top before adding it to my tree.

We usually don't use the typical star topper. This year I added twigs and assorted glittery, long twig stems. And although it was referred to as 'tree hair', I think it turned out quite nice, and not hair-like at all.

Wha-la!


A little trick I learned this year after reading blog after blog of professional tree decorators, different size light bulbs! Who knew??? So simple...  here's the difference:
(Left tree- with the pre-strung lights only; Right tree- after adding two strands of extra large bulb lights.)
 I love the dimension and extra light from the large bulbs! Thanks {Vintage Revivals} for the tip!

And my Christmas wreath that I was soooo excited about weeks ago? I'll have it made for next year.....


(Just keepin' it real!)


Oh, and throw away that wooden spoon. You'll likely never get the glue off. If you do, let me know how! 

Read More
Posted in Burlap, Christmas, Decorations, DIY, Felt, Winter | No comments

Dienstag, 22. Oktober 2013

Not Too Late For Fall Wreath

Posted on 08:05 by chsndrapaul
I received an email the other day with the title: 

"Not too late for fall"


Well THANK GOODNESS!
I put out my few fall decorations (inside my house) yesterday. 
{Better late than never!}

My mums, 
that have been sitting in the garage waiting to be planted for almost a month, 
on the other hand...
it is too late for them!
So... I'll stick with artificial flowers this fall!


I recently got a special visit from my oldest friend. 
Not that she is old, but I've known her my entire life. 
We are alike and different in the perfect combination.... when we see each other, even after months of being apart, we can pick up our friendship like we just hung out the day before. 
She's one of my bestest friends and extra special to me because were are family. 

Here we are this summer, holding each others' 3rd baby...


We decided to get crafty when she visited a couple weeks ago.
We pinned fall wreaths like crazy and came up with a combo that we liked.

To start, we took a trip to Hobby Lobby to purchase grape vine wreaths, burlap and flowers.

We started by bunching the burlap roll into little sections and secured with floral wire.


Then we placed the burlap onto the wreath to get an idea of how we wanted the burlap to lay...

When we liked how it looked, we attached it to the wreath with the same wire....

Next came the flowers {attached using hot glue}.


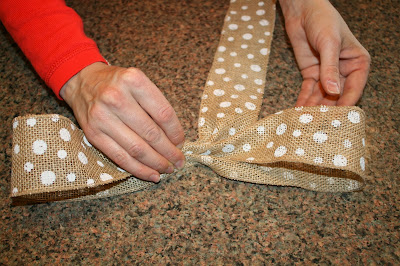
To make the bow, we used this technique:


VERY simple and easy. You can follow these instructions as well.

Then we came to a stopping point. Or at least, I did. My original idea was to add my last initial but the one I purchased was too big.


My cousin's initial was the perfect size.
After spray painting it with chalk board paint, it was the PERFECT addition to her wreath.
It will be so easy to change her 'Welcome' wreath to a 'Thank You' wreath or a 'Happy Birthday' wreath... the possibilities are endless!


I finished my fall wreath with a chevron burlap bow (made the same way as the one above) and a small burlap bunting that I painted with the letters F-A-L-L.


And meanwhile, in the living room....

{love time with family}


Happy FALL y'all!
Read More
Posted in Bows, Decorations, DIY, Fall, Wreaths | No comments

Montag, 25. Februar 2013

DIY Faux Roman Shade

Posted on 08:23 by chsndrapaul


I've read so many different ways to make your own faux roman shade.
(Faux meaning, it doesn't actually work as a shade; this one is staying put!)
The way I made mine was a compilation of several I have seen.

My laundry room window was the perfect opportunity to experiment in making one.
Here's the before......(sorry for the bad picture)
I bought a simple valance years ago when we first moved into our house. It was hung by a tension rod and pretty much forgotten about.
That is, until I found this fabric.... (LOVE at first sight!)

A little secret? It's actually a shower curtain. (I have a REALLY hard time finding fabric I love, that's good quality, and sold in local fabric stores. )
To make your own faux Roman shades, you'll also need tension rods (I used 4) and lining fabric (I used a white flat sheet).

I made my liner first. Measuring inside my window casing where my shade will hang.
The length of this will depend on how long you want your shade to be and the width will depend on your window.
The inside of my window measures 25 1/4 inches wide x 36 1/2 inches long so I made my curtain liner to be 25 1/4 inches wide x 22 inches long, finished. (I hemmed all 4 sides of the white liner.)


Next, I cut the fabric {ahem... the shower curtain} to be the same width but longer in length. After hemming the edges, the finished fabric rectangle measured 25 1/4 inches wide x 48 inches long.
I hemmed the bottom hem of the fabric wide enough to fit my last tension rod though to complete the folded look of a Roman shade.

I sewed the top of the liner and shade together so that they both hang from the same tension rod. (Just draped over the rod.)
I placed the other tension rods approximately where I thought I wanted the 'folds' in my Roman shade to be. (In front of the fabric.)
Don't stress over this part- I moved mine about 100 times to get the folds how I wanted them.


Starting with the top, empty rod, fold the fabric over to make the first fold...

Then repeat with the next one pulling your fabric from the bottom as to not mess up your first fold. (Continue this process until all of your folds are completed.)
After folding, my Roman shade measured 25 1/4 inches wide x 22 inches long.

Here, I moved the curtain to the side so you could see the tension rods. The lining fabric is hanging straight, and the tension rods that are holding the patterned fabric are in front of the lining fabric.
You will need one extension rod per fold.
This is where you can have a little fun! Making the folds close together, far apart, more, fewer, etc.

The ONLY thing I don't absolutely love about this Roman shade is the little part at the top of mine that I can see the tension rod. Like I said, this was an 'experiment'.
But, this project was much too easy to complain about! This faux Roman shade took me about an hour to make.
I'd call that a good nap-time project!


Read More
Posted in Curtains, DIY | No comments

Freitag, 22. Februar 2013

Chalk Paint

Posted on 19:52 by chsndrapaul


Well, I DID it! 
I fell for the (over priced) Anne Sloan Chalk Paint and bought a quart in Paris Grey. 
I also bought a sample in Pure White and Provence.

I may have also talked my sister-in-law into buying some. 
That way, I got to practice painting on her frame project before taking my paint home.
{hehe}

It sat on my basement steps for months.... honestly, I was a little scared to use it.
It could have been because it was so pricey.
It could have been because I was afraid I wouldn't LOVE it as much as everyone else.
It probably was because I was afraid I WOULD love it and have to fork out more mu-lah for all the other fun colors!!!! :)

Yes, I definitely love it.

My first project.....
Isn't it puuurrrty? (cough, cough)
This is my jewelry cabinet I've had for years. (And I still use it, I just hide it in my closet.)


I started out painting the creases with the Provence. And yes, you read that right...
I started out painting.
If you're unfamiliar with Anne Sloan Chalk Paint (also known as ASCP) you should know that there is NO prep. When I first heard that, the 38ish dollar sign was a little easier to swallow.


After the Provence dried, I painted the entire piece with the Paris Grey.

I experimented with my distressing methods after letting the grey dry.
First I tried lightly sanding to distress.
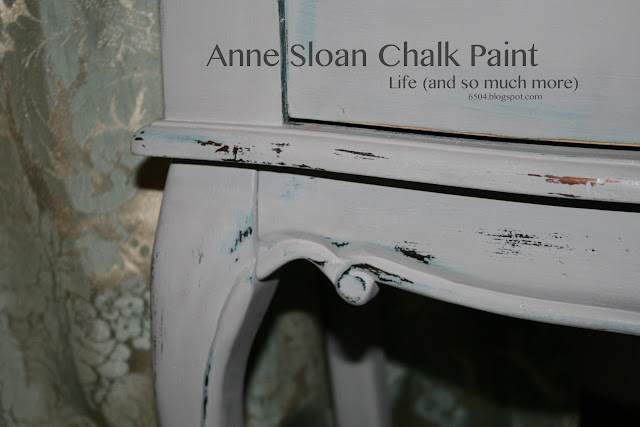
The second method I tried turned out to be the better option for me (for the look I was trying to achieve). I took a damp cloth and rubbed over the spots I wanted the teal (Provence) to show through. This way of distressing was dust free! It also allowed some of the original dark paint color to show though.
The tricky part is remembering where I painted the Provence since I didn't cover the cabinet in that color completely.

When all of the paint is dry, you will need to wax your piece. ASCP goes on easy but is very dull when it is dry. I purchased a clear wax from my local hardware store instead of buying the Anne Sloan Wax.
I used a clean, soft cloth and applied the wax evenly over the entire jewelry cabinet.
The wax will protect and it also gave the cabinet a finished look.


And it's back in the closet, but I'm not hating the color anymore!!!

Read More
Posted in Chalk Paint, DIY, Painting | No comments
Ältere Posts Startseite
Abonnieren Posts (Atom)

Popular Posts

  • DIY Faux Roman Shade
    I've read so many different ways to make your own faux roman shade. (Faux meaning, it doesn't actually work as a shade; this one is ...
  • Fall Pumpkin
    A super cute, super EASY way to give your home that extra special, personal touch....  Chalkboard Message Pumpkin.  Here's How: 1. Wash ...
  • It Never Hurts to Ask...
    When I shopped at Gymboree last week, I had every intention of ONLY buying Reese new school shoes. (This is the second year in a row that sh...
  • 31 Days of Things I've Been Wanting to Do, Day 8: You Raise Me Up
    Have you ever stayed the night somewhere that you literally had to 'climb into bed'? The beds in my parents house are exactly that. ...
  • Happy Fall Y'all!
    Did you think I fell off of the face of the planet? Well, I didn't and the great excuse for my absence....  life is happening too fast! ...
  • Are You Ready For Some Football?
    If you're like me and hosting a Super Bowl Party this weekend, you have probably already been thinking football food! I think 'Footb...
  • Spring Break Fun With Friends
    Last week was Spring Break. Although, it should be called Spring Busy. Because who really 'breaks'? We decided to cram as much fun a...
  • July 4th
    Happy Birthday America! My printable of choice this July 4th (Compliments of  Hostess With The Mostess !) {These kids crack me up.} Sometime...
  • Beefy Macaroni
    Filling. Easy. Comfort. Delicious. {All ways to best describe this  Beefy Mac!  } What You'll Need:  8 ounces elbow macaroni, uncooked...
  • 31 Days of Things I've Been Wanting to Do, Day 27: Nail Flop Turned Sweet Tea
    Some things that you plan on doing don't always turn out the way you wanted. I saw a nail painting technique on Pinterest I wanted to tr...

Categories

  • Appetizers
  • Apple
  • Baby
  • Beverages
  • Birthday
  • Books
  • Bows
  • Bread
  • Breakfast
  • Bump Date
  • Burlap
  • Cake
  • Carmel
  • Chalk Paint
  • Chalkboard
  • Chicken
  • Chocolate
  • Chocolate Chip
  • Christmas
  • Cleaning
  • Cookies
  • Cupcakes
  • Curtains
  • Decorating
  • Decorations
  • Dessert
  • Dinner
  • Dips
  • Disney
  • DIY
  • Easter
  • Elf on the Shelf
  • Fall
  • Family
  • Fathers Day
  • Favorites
  • Felt
  • Gift
  • Gifts
  • Graduation
  • Grilled
  • Halloween
  • Holidays
  • Kid Craft
  • Make-Up
  • Memories
  • Muffins
  • Olympics
  • Organization
  • Paint
  • Painting
  • Party
  • Photography
  • Pictures
  • Pie
  • Potatoes
  • Pregnancy
  • Pumpkin
  • Pumpkin Patch
  • Recipes
  • Sewing
  • Side Dishes
  • Soup
  • Spring
  • Starbucks
  • Thanksgiving
  • Traditions
  • Valentines Day
  • Winter
  • Wreaths

Blog Archive

  • ▼  2014 (16)
    • ▼  Juli (1)
      • July 4th
    • ►  Juni (1)
    • ►  Mai (2)
    • ►  April (2)
    • ►  März (5)
    • ►  Februar (2)
    • ►  Januar (3)
  • ►  2013 (33)
    • ►  Dezember (1)
    • ►  November (1)
    • ►  Oktober (2)
    • ►  September (1)
    • ►  August (1)
    • ►  Juli (1)
    • ►  Juni (1)
    • ►  Mai (1)
    • ►  April (2)
    • ►  März (7)
    • ►  Februar (8)
    • ►  Januar (7)
  • ►  2012 (113)
    • ►  Dezember (10)
    • ►  November (1)
    • ►  Oktober (4)
    • ►  September (2)
    • ►  August (6)
    • ►  Juli (7)
    • ►  Juni (8)
    • ►  Mai (12)
    • ►  April (21)
    • ►  März (14)
    • ►  Februar (15)
    • ►  Januar (13)
  • ►  2011 (74)
    • ►  Dezember (20)
    • ►  November (16)
    • ►  Oktober (31)
    • ►  September (2)
    • ►  August (1)
    • ►  Juni (1)
    • ►  April (3)
Powered by Blogger.

Über mich

chsndrapaul
Mein Profil vollständig anzeigen