6504-blogspot

  • Subscribe to our RSS feed.
  • Twitter
  • StumbleUpon
  • Reddit
  • Facebook
  • Digg

Freitag, 15. Juni 2012

Con'grad'ulations Reese!

Posted on 21:42 by chsndrapaul
Some may say I went a little 'over-board' with the whole graduation thing.
Okay, maybe I did... a little.... and I loved it, a LOT.

My first baby is now 'officially' a big girl.
Big girl as in, she attends the Ladies room on her own in restaurants and can fill her own plate of food when we are eating. Okay, so I usually 'happen' to have to go to the bathroom when she does and we're working on the 'only take what you can eat' thing.
She's more and more independent everyday! (sniff sniff)


May 25, 2012

Her class performed "The Little Red Hen".
Fittingly, Reese was the Red Hen!


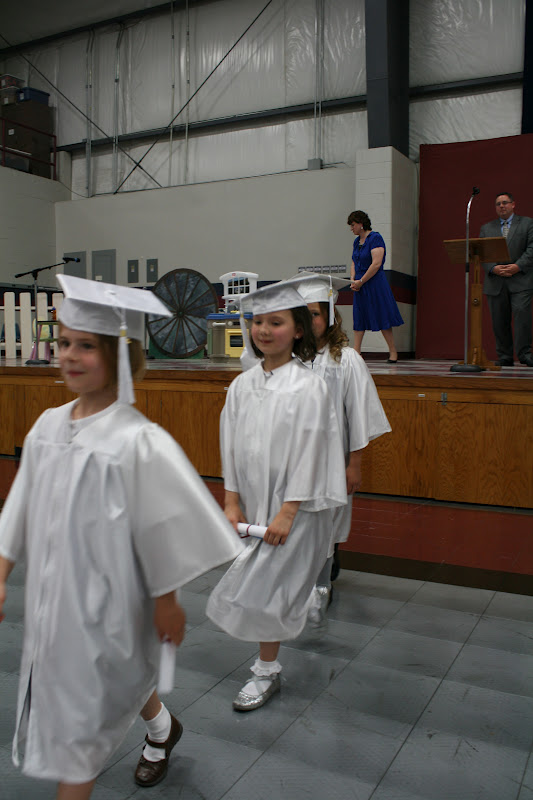
Here she comes! (It's very serious business!)


The class did many poems and songs they learned this year including Psalm 1!


When Reese was awarded her awards, her teacher had such sweet things to say about her. She told us how Reese was so kind to everyone in class and how hard she worked this year in her Bible memorization, reading and math.


Congratulations Class of 2024!!!!!!


On to first grade...

 My handsome guys in attendance!


We had a small dessert reception following the graduation.


First Grade Here We Come!


With the help of another Mom, we served lots of finger desserts, fruit and dip assortments.
However, I cannot take credit for the cake. (Just the fondant worm on top) :) 
A very sweet and talented lady in our Church agreed to make the cakes and turned my 
pinterest-found-print-outs into real cake!

(I'll share my dessert recipes and decoration how-to's in a future post.)


A 'School Supply Cake' and a framed teacher poster decorated the beverage table.


I also made graduation frames with the graduates' pictures. 
(They got to take these home to keep as a gift from Reese.)


Centerpieces for the dessert tables were pencil covered vases with fresh flowers.


Congratulations Reese!
We are so very proud of you! You have amazed us daily with all of the things you have learned this year! Thank you for being a sweet student, friend, sister and daughter. We thank Jesus that He put you in our family! What a blessing you are!
We love you!
Mommy, Daddy & Graham

Read More
Posted in | No comments

Montag, 4. Juni 2012

Last Day of Kindergarten

Posted on 13:03 by chsndrapaul
We recently celebrated the 
'Last day of Kindergarten' for this little girl....
 (You can get this sign here.)


Can you see the excitement????


These are the little bags we purchased for Reese's fellow girl classmates as graduation gifts.
(The boys got a bag full of Spiderman 'boy' things.)


Up next...... Kindergarten Graduation!!!
Read More
Posted in | No comments

Samstag, 2. Juni 2012

The BEST Macaroni and Cheese.....

Posted on 15:11 by chsndrapaul
I know, I know.....
EVERYONE and their Mother has 'The BEST' Macaroni and Cheese recipe.
Well, I do too! ;)

It's the only kind I make... er, um.... if I don't reach for the kind in the blue box.
(Hey! I am NOT the only person who serves the occasional
macaroni-and-cheese-from-a-box-with-powder-as-'cheese').

So, when I have the time (which really isn't an excuse with this recipe) and when I'm craving 'the real deal' this is what I serve.....


Baked Macaroni and Cheese

Here's What You Need:
2 cups elbow macaroni (or any pasta you have on hand)
2 eggs, beaten
1 can evaporated milk
1 stick of margarine, melted
1 bag of shredded cheddar cheese
1 cup Italian bread crumbs
1/2 teaspoon paprika
1/4 cup Parmesan cheese
4 Tb melted margarine

Here's How:
1. Preheat oven to 350*.
Bring a large pot of salted water to a boil. Add macaroni and cook until almost tender. Drain, rinse with cold water and set aside.

2. In a large bowl, beat the eggs with the milk and the stick of melted margarine. Season with salt.

3. Put 1/2 of the cooked macaroni into a 2 quart baking dish and top with 1/2 of the cheddar cheese.
Repeat layers.

4. Pour the milk mixture over the macaroni and cheese.

5. In a small bowl, mix the bread crumbs, paprika, 4 Tb melted margarine and the Parmesan cheese. Sprinkle bread mixture over the macaroni.

6. Bake at 350* until brown and bubbly, 40-45 minutes.

Make it and enjoy all of the cheesy yumminess that oozes out of the noodles.
Once you taste this recipe, I have a feeling you might agree with the title of
"Best" Macaroni and Cheese!


Adapted from Chef Joe's Baked Macaroni and Cheese.
Read More
Posted in | No comments

Mittwoch, 30. Mai 2012

Fruit Smoothie

Posted on 13:44 by chsndrapaul
I hope everyone had a great Memorial Day weekend!
I know we did.... any weekend that Daddy gets to be home for 3 days in a row is a good one!

Here's how we started out the morning.....


Blend one yogurt cup, 2 cups of fruit and crushed ice (omit the ice if you are using frozen fruit.)

The perfect addition to a warm breakfast or a great summer time treat!
Read More
Posted in | No comments

Montag, 21. Mai 2012

The Tooth Fairy Strikes Again...

Posted on 12:37 by chsndrapaul


Actually, it wasn't the Tooth Fairy's fault that the tooth (finally) fell out.
Reese has been bothered by her loose tooth for weeks now. Wondering and asking and even (dare, I say), obsessing about when this tooth would fall out!
I guess it didn't help that we kept saying things like,
"Chew carefully, you don't want to swallow it."
and
"I hope it stays in there till June or you'll be a toothless flower girl!"

Well, as usual, Mommy was right. I told her, "It'll fall out when it's ready!" And it did! Reese was getting comfy in bed a few nights ago. She was trying to pull her covers up, apparently that were stuck, and...  don't ask me how but, in the process of pulling the covers up, her knee flew up, bumped that barely-hangin-on tooth and out popped that baby pearly white. Thank goodness 'cause she was starting to not want to brush it because it was that loose. (gross)


That's when...
The Tooth Fairy Strikes Again!

She was sure to include in the letter, "Have fun picking out an outfit (for all 1,000 of your Build-A-Bear bears)!"


Dear Tooth Fairy,
Thank you for thinking of me!
Sincerely,
The Mommy Who Is Trying To Control The Stuffed Creature Population Around Here


Ahhhh... the day has come. My poor straggle tooth baby. She's still so adorable. It has been quite a hoot to see her do new tricks and re-learn certain things without that little tooth!
(I say little, but, my! What a big hole it has left!) ;)

Read More
Posted in | No comments

Freitag, 18. Mai 2012

(Another) Flower Power

Posted on 06:06 by chsndrapaul
This flower is beautiful. (And oh so easy).
And I have a beautiful sister-in-law that was a great model!

If you didn't think you could tackle the Flower Power from yesterday, I'm sure you can manage this one!


Here's How.....
You'll need to start with 6 cut circles- consecutive sizes.
DO NOT cut them perfect. It will be a waist of time. (You will see why in the next step.)


You want to know how I got the pattern for my circles? I grabbed 6 cups out of my cabinet. Seriously.
Then I used the cups to trace circles onto card stock. I cut the card stock circles out, put it on top of a stack of fabric and starting cutting.
Wha-la, circles.
:)

I'm not sure exactly what the fabric type is called. It feels silky, is shinier on one side and burns well.
Apparently, I missed the gene of fabric knowledge and sewing skills that runs so prominently in my family. :( Boo.


Once your circles are cut, burn the edges. Again, DO NOT be perfect. It adds so much when some petals are burnt a little more and not exactly the same.
This is when you need to keep in mind how big you want your circles. They will shrink a little when burnt.
Disclaimer: You are NOT setting the fabric on fire. It should simply just wilt as it gets close to the heat.


Layer and glue. (Hand stitching does well here too instead of glue.)

And you're done! Wait, what? Seriously???? Yes :)

Remember the gift I sent my mom for Mother's Day? She got a pretty flower on top.....

I attached a pin and added leaves to the back just like I showed you yesterday. I also finished the front with a small crystal gem in the center.


Sooo........
The EXACT same concept can be used to make a similar flower, but different and, I think, cuter. :)


See the difference? This one has more 'petals'.

Here's How....
Cut your same petals as the first flower shown on this post. Before you burn the edges, cut 4 slits around the circle. Like this:

Then, when you burn it (same technique) it turns out like this:

So cute, right????

What you make depends on the initial circle sizes you cut out.
{I cut much smaller circles for smaller flowers and bigger circles for a bigger flower.}

Make it a bobby pin.....

Or a ring.....

Don't forget the finishing touch of a jewel, gem, or button in the center!

Contrasting colors!!!!

The possibilities are endless people!!!!!
Happy Flower Power!
Read More
Posted in | No comments

Donnerstag, 17. Mai 2012

Flower Power

Posted on 19:32 by chsndrapaul
Did you think the flowers from yesterday were adorable?
Me too. (Even after hooouuuurrrsss of making them, I still think they are cute!)

I thought I would share my 'Flower Power' secrets with you.
(OK, DIY flowers are not secrets at all- they are all over the internet and you see them everywhere!)
But, there is much power behind knowing how to make your own flowers.

Here's how I create one type of power....

You'll need 7 of the same size petals.
Mine were scallopped for this flower, but circles will do too!
Also, cut two more circles, just a bit smaller. (One circle will be saved for the finishing touches and is not pictured here.)

We'll start with the pink petals. Four of them to be exact.
Fold in half and hot glue.

Fold in half again and hot glue. (Repeat 3 more times.)

Your petals will look like this....

Did I mention you'll need a glue gun?
Enter: Your new best friend...

Cover 1/2 of one of your smaller petals with glue....

Place 2 of your pre-folded, pre-glued petals on; like this:

Repeat with the other 1/2 of your petals. Hold till dry.
(Dry time depends on your glue. Hot glue: 5 seconds. Fabric -or any other type of glue: 10 hours.)
Did I mention your Hot Glue Gun is your best friend???

Now, if you counted correctly, you should have 3 more petals left.
Take two of them and fold, glue, fold, glue, repeat..... (just like before)

Glue those 2 newly-folded, newly-glued petals into the center.

With that last, final petal: fold, glue, fold, glue and then do an additional fold and glue. That way, this petal turns out a little smaller than the others....

Plop that little guy right in the middle. This just adds that little bit of extra fullness. :)

You can stop there, although, I wouldn't advise it..... I have more cuteness in store....

You'll need to cut 4 leaves out- all of the same size. You will also need that extra circle you cut from the beginning of this tutorial.
Just so you know... the pink and teal petals are cut from felt. The green is fabric.

I glued the green leaves on top of the pink felt leaves for stability and dimention.

Glue the two petals together....

Then glue the petals to the flower....


The back doesn't look that great as is:
(Enter the other teal petal)

Gluing that on top of the bottom of the flower adds that finishing touch. Now, all you need to add is a hair clip or a pin!


Here is another flower I made, the exact same way, only I used all fabric:


For this flower, I didn't add the 3 center, folded and glued petals.
I left it flat in the center and added a small felt circle to finish.


Don't forget to finish the backs of your flowers! (Using felt will help your flower maintain it's shape and add stability as it is worn.)
Make it even more fun and use contrasting and coordinating felt!

Easy enough, right????
Yes, it is. And yes, you can do it.
Try it, I dare ya!
Before you know it, you'll be a crazy flower making lady like me. Ha!


OK, two more great, easy ways to make flowers coming your way tomorrow!!!!!
(I'll try not to post this late! Yikes. Yawwwwwwnnnn.)
Read More
Posted in | No comments
Neuere Posts Ältere Posts Startseite
Abonnieren Posts (Atom)

Popular Posts

  • DIY Faux Roman Shade
    I've read so many different ways to make your own faux roman shade. (Faux meaning, it doesn't actually work as a shade; this one is ...
  • Fall Pumpkin
    A super cute, super EASY way to give your home that extra special, personal touch....  Chalkboard Message Pumpkin.  Here's How: 1. Wash ...
  • It Never Hurts to Ask...
    When I shopped at Gymboree last week, I had every intention of ONLY buying Reese new school shoes. (This is the second year in a row that sh...
  • 31 Days of Things I've Been Wanting to Do, Day 8: You Raise Me Up
    Have you ever stayed the night somewhere that you literally had to 'climb into bed'? The beds in my parents house are exactly that. ...
  • Happy Fall Y'all!
    Did you think I fell off of the face of the planet? Well, I didn't and the great excuse for my absence....  life is happening too fast! ...
  • Are You Ready For Some Football?
    If you're like me and hosting a Super Bowl Party this weekend, you have probably already been thinking football food! I think 'Footb...
  • Spring Break Fun With Friends
    Last week was Spring Break. Although, it should be called Spring Busy. Because who really 'breaks'? We decided to cram as much fun a...
  • July 4th
    Happy Birthday America! My printable of choice this July 4th (Compliments of  Hostess With The Mostess !) {These kids crack me up.} Sometime...
  • Beefy Macaroni
    Filling. Easy. Comfort. Delicious. {All ways to best describe this  Beefy Mac!  } What You'll Need:  8 ounces elbow macaroni, uncooked...
  • 31 Days of Things I've Been Wanting to Do, Day 27: Nail Flop Turned Sweet Tea
    Some things that you plan on doing don't always turn out the way you wanted. I saw a nail painting technique on Pinterest I wanted to tr...

Categories

  • Appetizers
  • Apple
  • Baby
  • Beverages
  • Birthday
  • Books
  • Bows
  • Bread
  • Breakfast
  • Bump Date
  • Burlap
  • Cake
  • Carmel
  • Chalk Paint
  • Chalkboard
  • Chicken
  • Chocolate
  • Chocolate Chip
  • Christmas
  • Cleaning
  • Cookies
  • Cupcakes
  • Curtains
  • Decorating
  • Decorations
  • Dessert
  • Dinner
  • Dips
  • Disney
  • DIY
  • Easter
  • Elf on the Shelf
  • Fall
  • Family
  • Fathers Day
  • Favorites
  • Felt
  • Gift
  • Gifts
  • Graduation
  • Grilled
  • Halloween
  • Holidays
  • Kid Craft
  • Make-Up
  • Memories
  • Muffins
  • Olympics
  • Organization
  • Paint
  • Painting
  • Party
  • Photography
  • Pictures
  • Pie
  • Potatoes
  • Pregnancy
  • Pumpkin
  • Pumpkin Patch
  • Recipes
  • Sewing
  • Side Dishes
  • Soup
  • Spring
  • Starbucks
  • Thanksgiving
  • Traditions
  • Valentines Day
  • Winter
  • Wreaths

Blog Archive

  • ▼  2014 (16)
    • ▼  Juli (1)
      • July 4th
    • ►  Juni (1)
    • ►  Mai (2)
    • ►  April (2)
    • ►  März (5)
    • ►  Februar (2)
    • ►  Januar (3)
  • ►  2013 (33)
    • ►  Dezember (1)
    • ►  November (1)
    • ►  Oktober (2)
    • ►  September (1)
    • ►  August (1)
    • ►  Juli (1)
    • ►  Juni (1)
    • ►  Mai (1)
    • ►  April (2)
    • ►  März (7)
    • ►  Februar (8)
    • ►  Januar (7)
  • ►  2012 (113)
    • ►  Dezember (10)
    • ►  November (1)
    • ►  Oktober (4)
    • ►  September (2)
    • ►  August (6)
    • ►  Juli (7)
    • ►  Juni (8)
    • ►  Mai (12)
    • ►  April (21)
    • ►  März (14)
    • ►  Februar (15)
    • ►  Januar (13)
  • ►  2011 (74)
    • ►  Dezember (20)
    • ►  November (16)
    • ►  Oktober (31)
    • ►  September (2)
    • ►  August (1)
    • ►  Juni (1)
    • ►  April (3)
Powered by Blogger.

Über mich

chsndrapaul
Mein Profil vollständig anzeigen