6504-blogspot

  • Subscribe to our RSS feed.
  • Twitter
  • StumbleUpon
  • Reddit
  • Facebook
  • Digg

Montag, 31. Oktober 2011

31 Days of Things I've Been Wanting to Do, DAY 31!!!!!!!!!

Posted on 11:54 by chsndrapaul
This is Day 31 of '31 Days of Things I've Been Wanting to Do'. I hope you didn't miss any days!
I have saved one of my favorite projects for last...
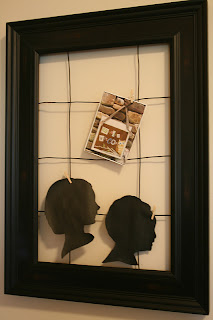
Frame Keeper


I was inspired when I saw this one in Pier One....
(Couldn't bring myself to pay $30 for it.)


What You'll Need:
Frame (I got a steal! Found this black one on clearance for $7)
Wire (Heavy but bendable)
Glue
Tiny Clothes Pins (There was a small part of me that needed to find a project just to use these! So cute!)


Here's How:
 Start by drilling holes for your wire. You can add as many or as few pieces of wire for holding things.

Next, cut your wire to desired length, add glue to the drilled holes and wire ends. Stick the wire into glue covered holes. Continue until done.
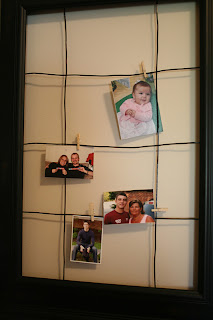
Now the fun part!!
"What do you use this new frame project for?" You might ask.
Let me count the ways....

Projects to do...

In your kitchen to hang recipes to try and grocery lists...

In your living room to hang Christmas cards that come in the mail....

In your office to hang business cards or bills to pay....

To hang wallet and other odd sized pictures that you can't find picture frames for...

Or to see the faces of family and loved ones that you don't see often but miss terribly....

The possibilites are endless!

Read More
Posted in DIY | No comments

Sonntag, 30. Oktober 2011

31 Days of Things I've Been Wanting to Do, Day 30: Silhouettes

Posted on 13:22 by chsndrapaul
I love the classic silhouettes of kids profiles! (Especially of my own kids!)

When I was graduating from High School, all of the graduates silhouettes were put on the wall of the graduation reception. I remember it being a big process to get those done. We taped white paper to the wall, stood in front of it as someone traced the shadow of our faces from a projector screen light. Then it had to be re-traced onto black paper and cut out. Sigh. Too much? I think so.

I combined a few easy ideas I got recently from other people who have made silhouettes of their children. (Plus added my own touch.) Here's how I made mine....

What You'll Need:
Canvas
Camera/ Printer
Black marker
Scissors
Black Paint (I also used gray paint)
Mod Podge (optional)
Cute kids

Here's How:

1. Have your willing and adorable children stand with their side to you against a contrasting, plain color wall. Take their picture. Be sure to get at their level so you get the actual shape of their head.


(If you are taking pictures of more than child, make sure you are the same distance away from them so ones head is not disproportional to the others'. I didn't not do this, as you can see. I was much closer to Graham when taking the pictures. This lead to much frustration and heart ache at the computer when trying to re size. Not to mention all the ink I wasted printing them a zillion times trying to get it to look right!)

2. Print the pictures on the computer.
(I later learned that printing them on card stock would have been better than just computer paper.)


3. Trace around the profiles. This just helps you in the next step...

4. Cut out the pictures. Following closely around the profile. 

5. I bought canvas for the back ground of my silhouettes. I didn't want the white background so I painted my canvas gray for a different look.) 
For a more feminine touch, you could put the silhouette in a black rounded frame and hang with ribbon. View other options here.

6. I had these two letters I had yet to do something with. I decided to paint them green to somehow incorporate them into my silhouettes. I took some of the same gray paint used to paint the canvas and lightly brushed the edges of the green painted letters.

7. In my excitement of this project, I somehow missed taking a picture of the silhouettes being painted. This is an important step! You'll want to paint the silhouettes black. (Or, really, any color you want!) To prevent the paper from rolling, print your picture onto card stock.
When they are dry, it's time to adhere them to the canvas. 
I used Mod Podge for this project. (If you've never used Mod Podge, go here.)
It works as a glue and sealer. (Keep in mind when it dries, it leaves the project shiny.)

8. When the Mod Podge is dry, you're almost done! I added picture hanging hardware to the back of my canvas to ensure easy hanging.


And Wha-la! Silhouettes of my favorite little ones!


The original place I found ideas for this was here.

Read More
Posted in DIY, Painting | No comments

Samstag, 29. Oktober 2011

31 Days of Things I've Been Wanting to Do, Day 29: Home Grown vs. Hand Picked

Posted on 08:25 by chsndrapaul
Home Grown
This was our first year at an attempt to have a tomato plant. And yes, I said attempt because, to date, we have had 4 tiny tomatoes come from one plant.

From the beginning, Reese especially was enthusiastic about growing our own food and making something from what we grew. I have done herbs the last few years with success so I thought we'd broaden our horizons. It budded 3 tiny green tomatoes and we waited, somewhat patiently, for them to turn any shade of red. One night, we had a big storm and our poor tomato plant got knocked over. One tiny green tomato fell off. Reese was so excited. We put it in the window and I said a little prayer that it would turn red....

And it did! It had a small blemish, so instead of putting it in a recipe, we sliced it to have with dinner.


(It didn't last very long!)


Hand Picked

Since we didn't include a home grown tomato in a recipe, I figured hand picking a pumpkin from a pumpkin patch was the next best thing.

This was my first time roasting a pumpkin. I'll admit, grabbing a can opener and opening a can of pumpkin might have been a little easier, but way less rewarding! I truly enjoyed preparing my own pumpkin!

Here's what I did...

Slice your pumpkin in half and take the seeds out.

Place the pumpkin cut side down in a 9x13 dish.
Add 1/2 cup of water to the bottom of the dish and loosely cover with foil.
Bake @ 325* for 1-2 hours. (Until your pumpkin is soft.)

Peel the skin away...

Place the pumpkin in a food processor...

Process until smooth....


My husband's Grandma gave me ideas on freezing the pureed pumpkin into small containers.
I did 1/4 cup, 1/3 cup and 1/2 cup containers. Brilliant!

Labeled the top...

And they are now frozen until the next time I need pumpkin!

I did leave some out for breakfast, of course....

Baked Pumpkin Oatmeal

What You'll Need:
3 cups quick cooking oats
1/2 cup brown sugar
1 cup milk
2 Tbs. margarine
2 eggs
2 tsp. baking powder
3/4 tsp. salt
2 tsp. vanilla
1/2 tsp. cinnamon
3/4 cup pumpkin
1/4 cup brown sugar (topping)


Here's How:
Mix all ingredients except brown sugar for the topping in a bowl.
Put in a 9x13 pan.
Sprinkle remaining brown sugar on top.
Bake at 350* for 20 minutes.
Serve with milk.


Original Baked Pumpkin Oatmeal recipe found here.
Read More
Posted in Breakfast, Pumpkin | No comments

Freitag, 28. Oktober 2011

31 Days of Things I've Been Wanting to Do, Day 28 (barely making it!): Pumpkin Party Complete!

Posted on 21:01 by chsndrapaul
You know it's been a good pumpkin carving party when everyone leaves with dessert in their bellies and a carved pumpkin in their hands!


I bought foam sheets for the little ones to cut out foam faces since they aren't quite ready to carve pumpkins.


The ghosts kept flying around the dessert table...
(Learn how I made them here.)

And what they left behind.....

My desserts for the evening....

Pumpkin Cupcakes with Cinnamon Cream Cheese Frosting
(Last time I made these, the icing went everywhere. I had to post a picture to show I can make icing the correct way!)


Hot Carmel Apple Cider

What You'll Need:
1/2 gallon apple cider
3/4 cup brown sugar
1 1/2 tsp. cider vinegar
1 tsp. vanilla extract
Cinnamon stick
6 whole cloves
1 orange, sliced
Caramel ice cream topping

Here's How:
Combine all ingredients except topping in a slow cooker.
Cover; cook on low for 5-6 hours.
Strain; discard spices and orange.
Serve in mugs and drizzle with carmel topping.

I try some type of apple cider with a 'twist' every year and this is by far my favorite! I found the recipe in a Gooseberry Patch catalog that came in the mail. It had a couple of free recipes in it and I am so glad this was one of them! I'm sipping some now as I type.... hmmmm......


Apple Pie Dip

I thought this recipe would be somewhat boring, but it actually has a great flavor! (And easy to make!)

What You'll Need:
2 cups peeled, diced apples
2 Tbs. lemon juice
3 Tbs. brown sugar
1/4 tsp. cinnamon
1 tsp. cornstarch dissolved in 1 tsp. water

Here's How:
Heat apples, juice, sugar and cinnamon in a small saucepan on the stove.
When heated through and apples get soft, add cornstarch.
Boil until thickened.
Serve with cinnamon/sugar tortilla chips
(To make the chips, cut flour tortilla shells into 8th's. Lay in a single layer on a cookie sheet. Spray lightly with water. Sprinkle with cinnamon and sugar mixture. I use 1 Tbs. sugar and 1/4 tsp. cinnamon. Bake at 400* for 8 minutes or until crisp. Cool and store in an air tight container.)
Read More
Posted in Beverages, Halloween | No comments

Donnerstag, 27. Oktober 2011

31 Days of Things I've Been Wanting to Do, Day 27: Nail Flop Turned Sweet Tea

Posted on 10:54 by chsndrapaul
Some things that you plan on doing don't always turn out the way you wanted. I saw a nail painting technique on Pinterest I wanted to try on my daughter. She is a nail biter and we're trying to help her quit. I have a present wrapped and ready to be opened when I can see 'white on her nails' (that's what we call long nails.) She informed me that to help her stop biting her nails, they needed to be painted. So, I found this idea...
"How to Paint Your Nails by Dipping Them in Swirled Paint"

Sounds fun, right? Well, it didn't work as well as we had hoped. Here was our finished project...
(In my defense, I didn't have much nail to work with.)

She still loved it because it was something different.
Maybe I'll be adventurous and try another nail technique sometime, but in the meantime, I'd love to share how I make southern sweet tea....

What You'll Need:
3 Family size tea bags (or 6 small bags)
1 Cup of sugar
1/4 tsp. baking soda

Here's How:
1. Fill your coffee pot with water how you would if you were making a full pot of coffee. Instead of adding a coffee filter and ground coffee, add tea bags to the pot.

2. Then add the baking soda to the tea bags.
(I use decaffeinated tea bags because we have sweet tea most nights for dinner and my kids enjoy drinking it too.)

3. Brew...

4. While it's brewing, add your cup of sugar to a gallon sized pitcher.

5. When the tea is done, remove the tea bags from the coffee pot. (Don't squeeze them or you'll end up with tea 'floaties'.)

6. Stir well until the sugar is dissolved. Then add ice and cold water to fill the pitcher.

Wha-la! (And good sweet tea is NOT just for the summer time!)

Read More
Posted in Beverages | No comments
Neuere Posts Ältere Posts Startseite
Abonnieren Posts (Atom)

Popular Posts

  • DIY Faux Roman Shade
    I've read so many different ways to make your own faux roman shade. (Faux meaning, it doesn't actually work as a shade; this one is ...
  • 31 Days of Things I've Been Wanting to Do, Day 8: You Raise Me Up
    Have you ever stayed the night somewhere that you literally had to 'climb into bed'? The beds in my parents house are exactly that. ...
  • It Never Hurts to Ask...
    When I shopped at Gymboree last week, I had every intention of ONLY buying Reese new school shoes. (This is the second year in a row that sh...
  • Fall Pumpkin
    A super cute, super EASY way to give your home that extra special, personal touch....  Chalkboard Message Pumpkin.  Here's How: 1. Wash ...
  • Are You Ready For Some Football?
    If you're like me and hosting a Super Bowl Party this weekend, you have probably already been thinking football food! I think 'Footb...
  • Happy Fall Y'all!
    Did you think I fell off of the face of the planet? Well, I didn't and the great excuse for my absence....  life is happening too fast! ...
  • Beefy Macaroni
    Filling. Easy. Comfort. Delicious. {All ways to best describe this  Beefy Mac!  } What You'll Need:  8 ounces elbow macaroni, uncooked...
  • Easy Lemon Asparagus
    Do you need a new side dish to throw into your dinner rotation? Well, Lemon Asparagus is just about the easiest side dish I've ever made...
  • Crock Pot Baked Potato Soup
    I've made this delicious, belly-warming soup a lot.  And each time, I am so excited at how much it ACTUALLY tastes like  Baked Potatoes!...
  • Salsa
    Some of my favorite recipes come from a friend, of a friend, of a friend.... Here's a good one from a friend of a friend. Salsa Yeah, no...

Categories

  • Appetizers
  • Apple
  • Baby
  • Beverages
  • Birthday
  • Books
  • Bows
  • Bread
  • Breakfast
  • Bump Date
  • Burlap
  • Cake
  • Carmel
  • Chalk Paint
  • Chalkboard
  • Chicken
  • Chocolate
  • Chocolate Chip
  • Christmas
  • Cleaning
  • Cookies
  • Cupcakes
  • Curtains
  • Decorating
  • Decorations
  • Dessert
  • Dinner
  • Dips
  • Disney
  • DIY
  • Easter
  • Elf on the Shelf
  • Fall
  • Family
  • Fathers Day
  • Favorites
  • Felt
  • Gift
  • Gifts
  • Graduation
  • Grilled
  • Halloween
  • Holidays
  • Kid Craft
  • Make-Up
  • Memories
  • Muffins
  • Olympics
  • Organization
  • Paint
  • Painting
  • Party
  • Photography
  • Pictures
  • Pie
  • Potatoes
  • Pregnancy
  • Pumpkin
  • Pumpkin Patch
  • Recipes
  • Sewing
  • Side Dishes
  • Soup
  • Spring
  • Starbucks
  • Thanksgiving
  • Traditions
  • Valentines Day
  • Winter
  • Wreaths

Blog Archive

  • ►  2014 (16)
    • ►  Juli (1)
    • ►  Juni (1)
    • ►  Mai (2)
    • ►  April (2)
    • ►  März (5)
    • ►  Februar (2)
    • ►  Januar (3)
  • ►  2013 (33)
    • ►  Dezember (1)
    • ►  November (1)
    • ►  Oktober (2)
    • ►  September (1)
    • ►  August (1)
    • ►  Juli (1)
    • ►  Juni (1)
    • ►  Mai (1)
    • ►  April (2)
    • ►  März (7)
    • ►  Februar (8)
    • ►  Januar (7)
  • ►  2012 (113)
    • ►  Dezember (10)
    • ►  November (1)
    • ►  Oktober (4)
    • ►  September (2)
    • ►  August (6)
    • ►  Juli (7)
    • ►  Juni (8)
    • ►  Mai (12)
    • ►  April (21)
    • ►  März (14)
    • ►  Februar (15)
    • ►  Januar (13)
  • ▼  2011 (74)
    • ►  Dezember (20)
    • ►  November (16)
    • ▼  Oktober (31)
      • 31 Days of Things I've Been Wanting to Do, DAY 31!...
      • 31 Days of Things I've Been Wanting to Do, Day 30:...
      • 31 Days of Things I've Been Wanting to Do, Day 29:...
      • 31 Days of Things I've Been Wanting to Do, Day 28 ...
      • 31 Days of Things I've Been Wanting to Do, Day 27:...
      • 31 Days of Things I've Been Wanting to Do, Day 26:...
      • 31 Days of Things I've Been Wanting to Do, Day 25:...
      • 31 Days of Things I've Been Wanting to Do, Day 24:...
      • 31 Days Of Things I've Been Wanting to Do, Day 23:...
      • 31 Days of Things I've Been Wanting to Do, Day 22:...
      • 31 Days of Things I've Been Wanting to Do, Day 21:...
      • 31 Days of Things I've Been Wanting to Do, Day 20:...
      • 31 Days of Things I've Been Wanting to Do, Day 19:...
      • 31 Days of Things I've Been Wanting to Do, Day 18:...
      • 31 Days of Things I've Been Wanting to Do, Day 17:...
      • 31 Days of Things I've Been Wanting to Do, Day 16:...
      • 31 Days of Things I've Been Wanting to Do, Day 15:...
      • 31 Things I've Been Wanting to Do, Day 14: Pumpkin...
      • 31 Days of Things I've Been Wanting to Do, Day 13:...
      • 31 Days of Things I've Been Wanting to Do, Day 12:...
      • 31 Days of Things I've Been Wanting to Do, Day 11:...
      • 31 Days of Things I've Been Wanting to Do, Day 10:...
      • 31 Days of Things I've Been Wanting to Do, Day 9: ...
      • 31 Days of Things I've Been Wanting to Do, Day 8: ...
      • 31 Days of Things I've Been Wanting to Do, Day 7: ...
      • 31 Days of Things I've Been Wanting to Do, Day 6: ...
      • 31 Days of Things I've Been Wanting to Do, Day 5: ...
      • 31 Days of Things I've been Wanting to Do, Day 4: ...
      • 31 Days of Things I've Been Wanting to Do, Day 3: ...
      • 31 Days of Things I've Been Wanting to Do, Day 2: ...
      • My 31 days of October.....
    • ►  September (2)
    • ►  August (1)
    • ►  Juni (1)
    • ►  April (3)
Powered by Blogger.

Über mich

chsndrapaul
Mein Profil vollständig anzeigen